New Payroll Administrator Guide
New to Namely Payroll? Read our guide to familiarize yourself with everything a Payroll administrator needs to know - payroll processing, tax remittance, data management, hour-tracking and much more!

Welcome to Namely Payroll! This New Admin Guide will introduce you to payroll at Namely, providing an overview of banking and funding methods, employee and company setup, tracking hours, processing payroll, managing taxes, and more.
Learning Objectives
Once you've read through this guide, you'll be able to:
-
Access Namely Payroll.
-
Describe the core functionality of Namely Payroll.
-
Understand the different payroll steps required to process payroll.
-
Articulate how tax is managed at Namely.
UNDERSTAND YOUR SERVICE OFFERING - 2 MIN READ
READ ON TO UNDERSTAND HOW YOUR SERVICE POD CAN HELP YOU MANAGE YOUR PAYROLL PROCESSES.
Namely has two distinct service offerings available that offer different levels of support when it comes to processing payroll and other tasks.
-
Managed Payroll - With this offering, you'll have a dedicated Payroll Consultant and a team of payroll experts who will assist you with your day-to-day payroll administration, including tax registration, data imports, general ledger configuration, auditing, garnishment administration, payroll processing and more!
-
Software as a Service - You won't be by your lonesome with our core offering! All clients will have a dedicated Pod Manager and Service Pod who are here to help you troubleshoot payroll issues, and answer any questions you may have as you're working in Namely.
This guide will help familiarize you with Namely Payroll regardless of the offering you've purchased, but it is worth noting that you'll receive additional assistance completing the tasks detailed below from Service Pod and Payroll Consultant if you are a Managed Payroll customer:
-
Pre-payroll processing support (assistance auditing common payroll set-up errors, checking timesheet completion, and more)
-
Payroll processing (keying, importing, and overriding payroll cycle items)
-
Post payroll processing support (ad-hoc questions, reporting help, best practice consulting)
We recommend connecting with your Payroll Consultant to ensure proper expectations and timelines are set to solidify your partnership.
TIP:
If you're interested in becoming a Managed Payroll customer, email sales@namely.com!
ACCESSING NAMELY PAYROLL - 1 MIN READ
WE’LL SHOW YOU HOW TO LAUNCH NAMELY PAYROLL, WHERE MOST PAYROLL TASKS ARE MANAGED.
Now that we're acquainted with one another - it's time to jump in and familiarize yourself with Namely Payroll, the platform you'll spend most of your time in handling payroll-related tasks. You can access Namely Payroll by clicking the Manage Payroll button on the left-hand side of your Namely site.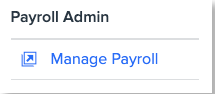
TIP:
The administrative platform in Namely Payroll can only be accessed by employees with a Namely Payroll User Administrative Role.
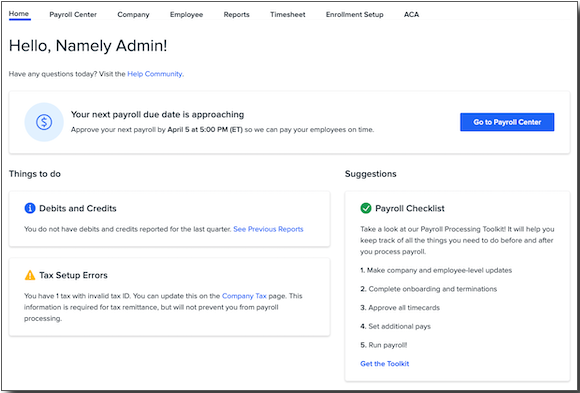
This will launch the Payroll Dashboard, your home base for all things pay-related. It provides a quick view of important information, including:
-
Your next scheduled pay cycle and its submission deadline.
-
Quarterly debits and credits that have posted to your account.
-
Tax setup errors that could prevent Namely from remitting payments on your behalf.
-
A helpful checklist to make sure you're well-prepped to kick off your next pay cycle.
Next, we'll explore the core functionality of Namely Payroll.
PAYROLL PROCESSING - 8 MIN READ
LEARN HOW TO PROCESS REGULARLY SCHEDULED AND OFF-CYCLE PAYROLLS IN THE PAYROLL CENTER.
When you think about Payroll software, the first thing that probably comes to mind is paying your employees. It's kind of the point of the whole thing, isn't it?
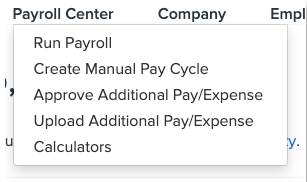
Payroll Processing takes place in the Payroll Center, which can be launched by hovering over the menu link at the top of your screen and clicking Run Payroll, or from the top of the Payroll Dashboard, as your pay date approaches.
You'll notice that the Payroll Center is divided into two different types of payrolls:
-
Standard Payrolls - These are your regularly scheduled payrolls, aligned to the pay cycle calendars assigned to your company's Pay Groups.
-
Manual Payrolls - Often referred to as "off-cycle" payrolls - these are pay cycles you can manually set up for additional payments you need to make to employees, like bonuses and severance pay.
It's important to note that payroll does take some time to process after you've approved payment, depending on the funding method your company uses. Namely offers two main funding methods:
-
Reverse Fed Wire - This is the standard method of payroll processing at Namely, and requires at least two days for funds transfer. With this funding method, Namely will initiate a wire and "pull" funds from your bank account on file.
-
Three-Day ACH - This method requires three days for fund transfer. With this method, our bank will debit your company's bank account via ACH.
All payroll must be completed and submitted before 5:00 PM ET on the specified due date or your pay cycle will not run as planned and funds will not be transferred.
If you ever miss your payroll deadline - we can help you keep your pay date with a One-Time Wire. If this occurs, you'll need to contact your bank to initiate the wire and contact your Service Pod for assistance.
Processing a Standard Payroll
Next, we'll take a look at processing some payrolls!
TIP:
For a more detailed guide to payroll processing, read Namely Payroll Processing.
To start a regularly scheduled pay cycle:
-
Click the Payroll Center tab.
-
Click Run Payroll next to the pay cycle you want to start.
-
After the pay cycle has been initiated, the Run Payroll button changes to Continue.

-
Click Continue to proceed!
Payroll Steps
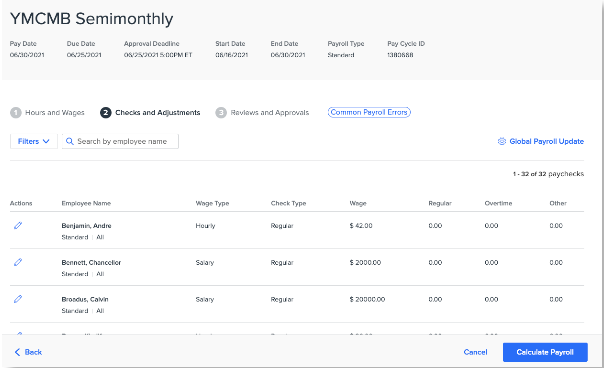
Payroll Processing is split into three different steps. Each step allows you to complete different payroll tasks.
Step 1 - Hours and Wages
The first screen you'll see after clicking Continue is Step 1: Hours & Wages. This step allows you to:
-
Add and remove employees from your pay cycle.
-
Add and edit wages.
-
Edit additional payments and checks.
-
Upload hours from Timesheets.

Step 2 - Checks and Adjustments
Once you've advanced past step one, it's time for... you guessed it, step two! The second step in payroll processing is designed mostly to make one-time adjustments to employee pay. More specifically, this step allows you to:
-
Make global payroll updates to all of your employees' paychecks.
-
Make one-time edits to deductions, garnishments, and tax withholding information.
The beauty of these adjustments is that they will only apply to the pay cycle you're running - for example, if you need to adjust an employee's Medical deduction this time around because of an overpayment, it will only apply to the paycheck they receive from this pay cycle.
Step 3 - Reviews and Approvals
The final step in Namely Payroll is reached by clicking Calculate Payroll from Step 2. This step will provide you with an opportunity to review your pay cycle data to ensure all payroll information is accurate prior to approving and processing your payroll. Some items to review on this step include:
-
Individual employee pay stubs
-
Preview Payroll Summary - to review total wages, net pay, deductions, employee collected and uncollected taxes, employer collected taxes, and any printed checks.
-
Preview Payroll Register - to review wage, employee and employer taxes, deductions and net pays.
-
Employees not included in Payroll - to review employees who are not included in a pay cycle run.
TIP:
We recommend following these best practices on Step 3 that will help you achieve payroll accuracy.
If you've found any errors, you can click Back to correct them. If everything looks good, click Approve Pay Cycle and sit back and wait for your payroll to be funded!
Manual Payrolls
Manual Pay Cycles, commonly referred to as off-cycle payrolls, are payrolls processed outside of your standard payroll schedule. Manual Pay Cycles can be run at any time, and there is no limit to the number of cycles you can run. They're commonly used to process bonuses or commissions or to make adjustments to payroll totals.
To start a manual pay cycle:
-
Click Create Manual Pay Cycle.

-
Select a Pay Group.
-
Enter a Pay Cycle Start Date.
-
Enter a Pay Cycle End Date.
-
Enter a Pay Cycle Pay Date.
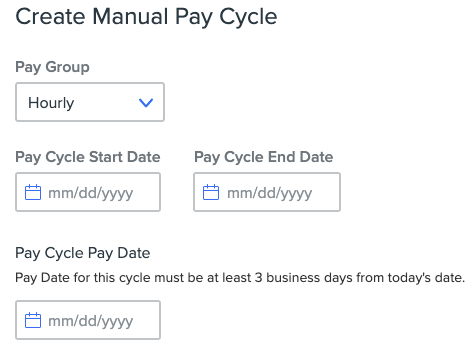
-
Click Create Pay Cycle. The new payroll cycle appears under Manual Payrolls in the payroll center.
-
Click Run Payroll next to the manual pay cycle you created. Manual Payroll cycles follow the same three steps as Standard Pay Cycles.
-
After the payroll has been initiated, the Run Payroll button changes to Continue.
Learn More!
If you'd like to learn more about Payroll Processing, review the resources in our Payroll Processing and Reporting toolkit. It contains in-depth, step-by-step instructions on everything you'd ever need to know around payroll processing, banking and funding, corrections, deductions, and more.
HOURS AND ADDITIONAL PAY UPLOADS - 5 MIN READ
PROCESS PAYMENTS FOR YOUR HOURLY EMPLOYEES AND USE OUR ADDITIONAL PAY UPLOADER TO HANDLE ANY WAGES BEYOND BASE SALARY.
Payroll processing isn't just about paying salaried employees their standard wages every couple of weeks. Odds are, you have some hourly employees. And what about paying things like quarterly commissions, annual bonuses, or retro pay? No matter the case, we've got you covered.
Have Your Hours Ready
Namely offers two different time-tracking solutions that you can use to manage your hourly employees:
-
Namely Time Powered by TCP
-
Timesheets
Whether you use Timesheets, Namely Time, or a third-party to manage time and attendance for your employees, you'll need to prepare your hours and upload Excel files in the Payroll Center ahead of processing payroll.
Namely Time Powered by TCP
If you're a Namely Time client, uploading your hours is as simple as setting a date range, picking your pay cycle and clicking Generate.
To sync your hours from Namely Time to Payroll:
-
In Namely Time, click Hours.
-
Click Period Export.
-
Select Namely (API) (7.0.81.13) from the Export Format dropdown.
-
Enter the Start and Stop Dates for the pay cycle.
-
If you have multiple pay groups or only want to export a specific set of employees, you can apply an Employee Filter.
-
Expand the Configuration tab.
-
Enter your organization's Default Hour Types as they appear in Payroll (also known as Hour Benefit Types.)

-
Under Data Options, select the Payroll Cycle ID that corresponds to the pay cycle you are running in Namely.
-
Click Generate.
Timesheets and Third-Party Time-Tracking
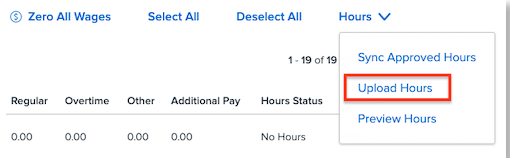
If you have hourly employees and use Timesheets or a third-party timekeeping software, you'll need to Upload Hours into a Pay Cycle to pay out hourly employees. The pre-work steps will vary, depending on if you use Timesheets or a third-party solution, but both methods will involve uploading a .csv during Step 1 of payroll.
-
In Step 1 of payroll processing, click Upload Hours.
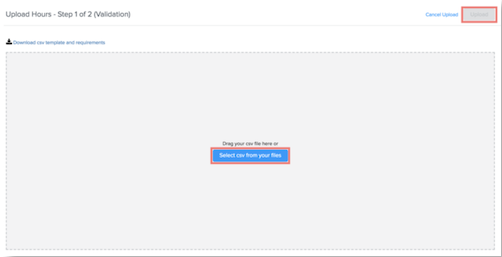
-
Click Select csv from your files or drag and drop the file into the validation window.
-
If your file contains any errors, they will display in the validation window. You can't finish your upload until the errors have been corrected.
-
Click Upload.
Additional Pay Uploads
Sometimes, employees need to be paid for things other than their standard wages. Salespeople are often paid quarterly commissions. Bonuses are paid to employees who do outstanding work. Maybe your company reimburses people for their cell phones.
All of these payments and more can be handled with the Uploading Additional Pay tool, which can be found in the Payroll Center dropdown. This process involves preparing a spreadsheet that is then uploaded into your pay cycle.
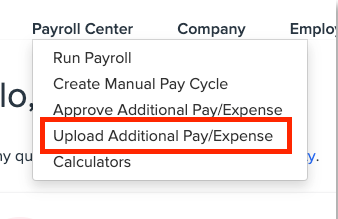
If you have an additional payment to make, you'll want to upload it prior to opening your standard payroll cycle.
-
Click Upload Additional Pay/Expense.
-
Click Upload Specifications to download a .csv template you can use to ensure you're using the proper format.
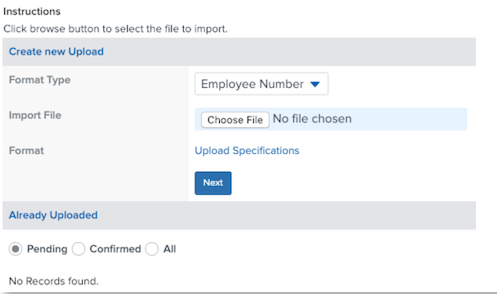
-
Add your data to the spreadsheet. Your spreadsheet will ask you for a unique identifier. This will be used by the system to identify which lines of data correspond to each employee.
-
Upload your file.
-
Verify that your records were uploaded successfully, and click Finish.
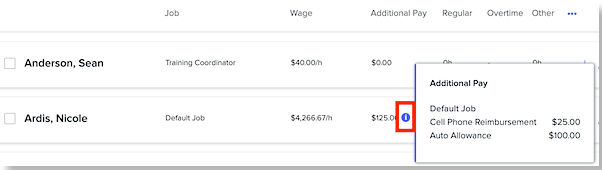
When you open your Standard Payroll cycle, you can view each employee's additional payment records in Step 1 by hovering over the information icon under the Additional Pay column.
COMPANY SETTINGS - 8 MIN READ
MANAGE YOUR COMPANY’S BANKING INFORMATION, TAX IDS, DEDUCTIONS, WORKER’S COMPENSATION RATES, AND MORE!
Rome wasn't built in a day - and neither was your company! Fortunately, setting up your company in Namely Payroll isn't as complicated as an ancient empire or even your place of business. The Company section of Namely Payroll is where you'll manage things like Tax IDs, Deductions, Worker's Compensation rates, your company's banking information, and more.
To access Company Settings, just click Company from the top navigation of Namely Payroll.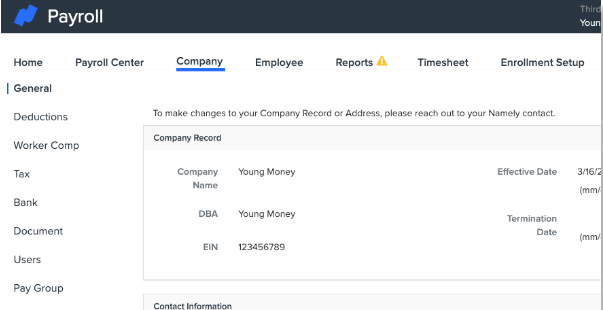
Next, we'll take you on a tour of the most important menu options and sections payroll administrators should be familiar with in Company Settings.
General
The General page contains important information about your company, including:
-
Company Name, and any applicable DBA
-
Your Company's FEIN
-
Your Company's address
-
The contact information for your main Payroll Administrator
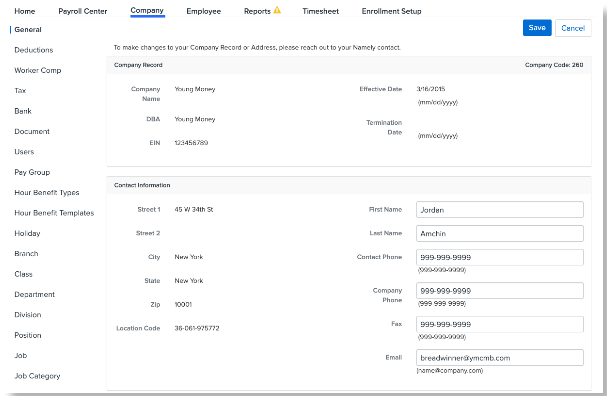
The information on this page isn't frequently updated - and, in fact, much of it can only be edited by your Service Pod. It's a good idea to contact your pod if you wish to make any changes to this information.
Deductions
You can manage the different deduction types available for use when running payroll from the Deductions page in Company Settings.
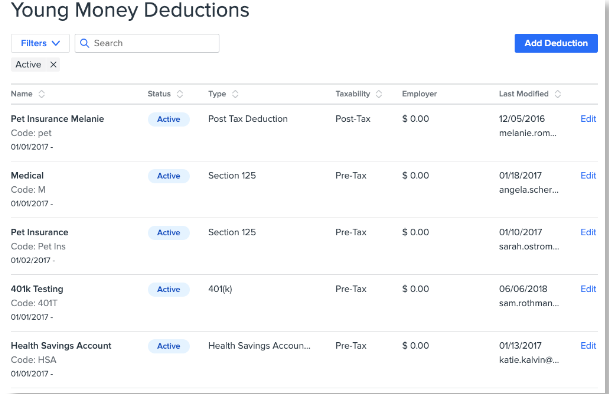
You can add as many deductions as you need to manage your payroll. Here are some of the options you'll have available when configuring or editing a deduction:
-
Deduction Type - This determines the taxation of the deduction, and how it may affect an employee's W-2 or 1099.
-
Deduction Name - These are unique names you can give your deduction. These will also appear on an employee's pay stub.
-
Paid by - You can determine if your deduction is employee or employer-paid (or both!) You'll also have the ability to have deductions calculate based on a percentage of an employee's gross or post-tax wages.
-
Cap Amount - For those times where you need to ensure an employee doesn't over deduct or over-contribute to an insurance plan or savings account (Note: Namely does have hard-coded caps on certain deduction types, like 401k.)
-
W-2 Mapping - Does your deduction need to appear in Box 12, Code DD? It's as simple as checking a box if it does!
Once you've created a deduction, it can be set up on an employee's profile to deduct from their pay each time you run payroll.
Worker's Compensation
Namely Payroll can help you report on Worker's Compensation payments from the Worker Comp tab. We do not collect or remit payments for Worker's Compensation, but adding Worker's Comp records will allow you to produce reports on payments made in Namely Payroll.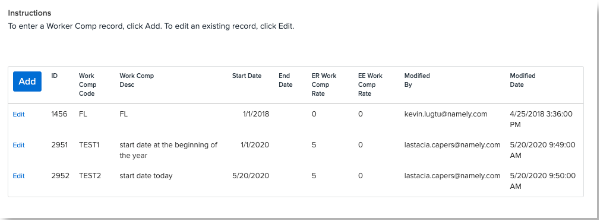
Tax
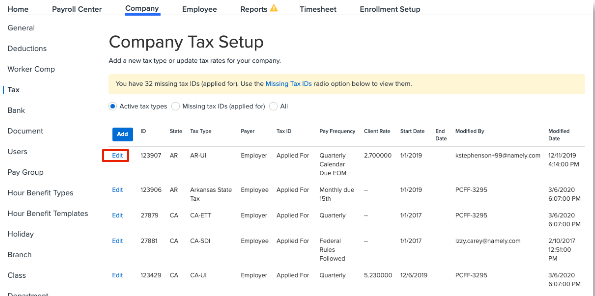
Each state your company operates in and has employees living and working in will have taxes that need to be paid by your company or employees. The Tax section of Namely Payroll is where you must enter information on state and local taxes that Namely can collect and remit to agencies on your behalf. 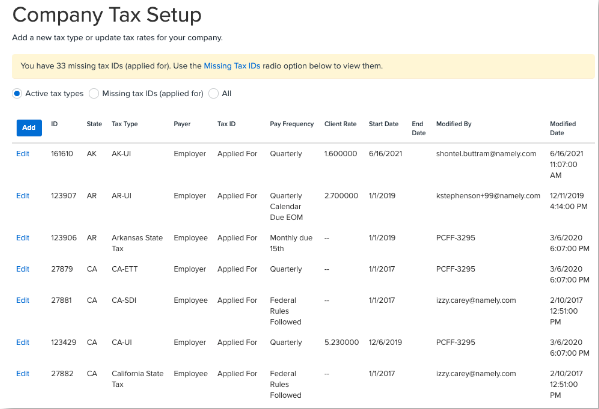
Namely automatically will add relevant taxes to the Tax page in Company Settings when you have a new office location or an employee working or living in a new state. When that occurs, it's your responsibility to register for a tax account with the jurisdictions (or initiate a Tax Registration project, if you're a Managed Services customer) and to update the tax with your company's unique ID and tax rate.
Until you enter your ID, your tax will remain in Applied For status. Once the ID is entered, Namely can collect and remit taxes to the agency. Any prior funds that should have been paid to the agency will need to be wired to Namely for remittance. Keep in mind that there are a number of taxes we do not file, collect and remit. You will need to collect and remit funds to the agencies mentioned in Taxes Namely Does Not Collect and Remit.
We'll cover the tax process in a bit more detail later on in this guide!
Bank
This section is where you can manage the details for your company's bank account.
You'll need a bank account on file so that Namely knows where to draw money from in order to fund your payroll and remit tax payments.
Users
You can control who has administrative access, and what permissions they have in Namely Payroll from the Users section of Company Settings.
TIP:
This article explains the different levels of access available to Payroll administrators: Namely Payroll User Administrative Roles
Pay Group
Pay Groups are groups of employees who are paid at a given cadence (semimonthly, biweekly, weekly, etc.) Each pay group will have its own pay cycle calendar and will have its own independent standard payroll run based on the pay frequency you select. 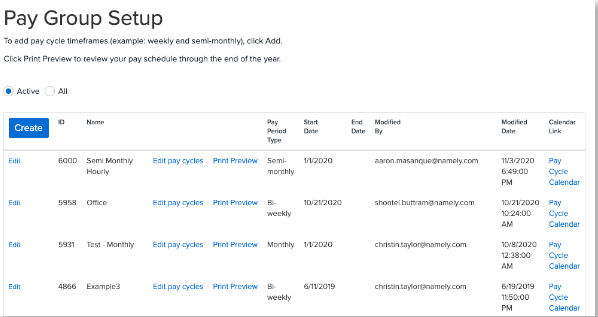
Companies often have different pay groups for salaried or hourly employees, or in instances where certain employees get paid more frequently than others (sometimes, sales departments are paid weekly, while support staff are paid semi-monthly.)
Jobs
Track wages for different jobs performed by an employee using the Jobs section! This is great for companies whose employees serve multiple job functions. For example, an employee who works as a lifeguard also teaches swimming lessons will have "Lifeguard" listed as their default job in addition to a "Swim Instructor" job.
This enables your employee to view the split pay on their paystubs and allows for your company to accurately report on the wages paid to the employee per job.
Now that we've gone over your company set up - it's time to talk about your employees!
EMPLOYEE PROFILES AND DATA - 6 MIN READ
REVIEW AND MAKE CHANGES TO YOUR EMPLOYEE’S PAYROLL DATA, TAXES, WITHHOLDING AND MORE.
Deductions? Recurring Additional Pay? Tax withholding? All of your individual employee's payroll data is stored on their Namely Payroll employee profile, which can be accessed by clicking Employee from the top navigation. This will launch a search page that allows you to find the appropriate profile with a number of search parameters.
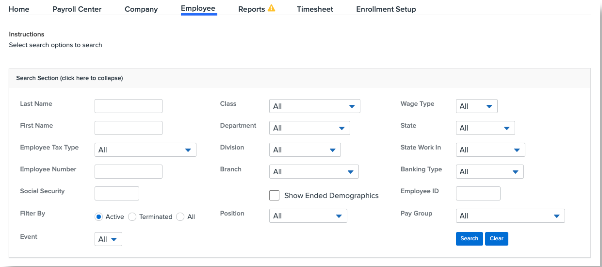
The Employee page will load with all of your employees listed by default. Narrow your search results by using the above facets and filters to isolate your search to the employee or employees you'd like to view. Once you've found the employee in question, click on their name to view their profile. Next, we'll walk through the most important parts of an employee's profile.
General
The General page contains basic information about the employee. Most of the fields on this page are updated in HRIS and flow over to the employee's payroll profile. This article provides an overview of what employee data is entered in HRIS, and what is entered in Payroll.
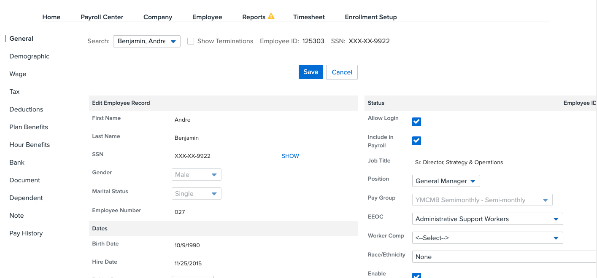
There are a few other items that are contained within the General page, including:
-
A checkbox that allows an employee to login to Namely Payroll
-
EEOC data
-
Timesheets jobs, roles and reporting structure (for Timesheets clients)
-
An employee change log, for tracking payroll profile changes.
Demographic
The Demographic page contains information on an employee's Branch, Division, Department or Class. This data can be updated in either Namely Payroll or HRIS, depending on if your company has applied our Org Units enhancement or not.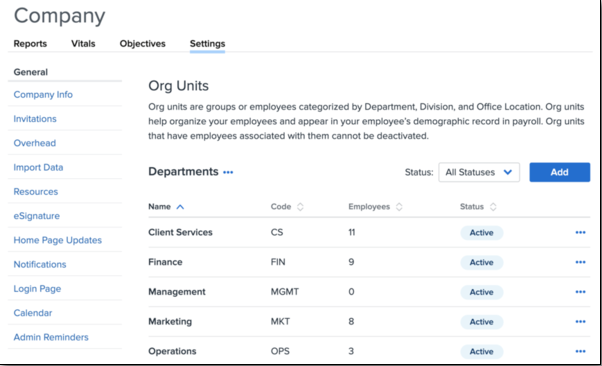
Wage
This page contains the employee's wage information. You can click Edit to add or edit any Recurring Extra Pay an employee might have (i.e., if they are paid something other than their standard wage every time you run payroll.)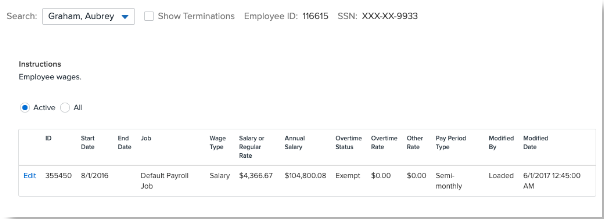
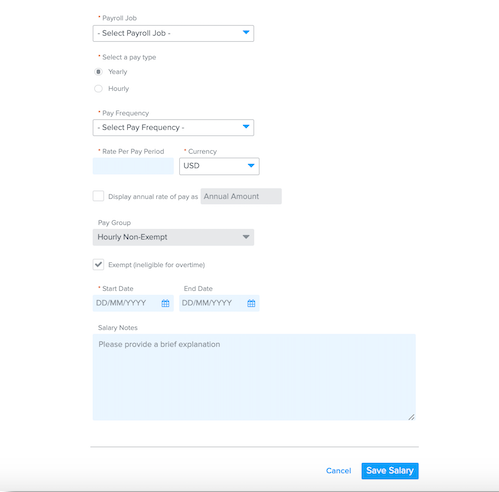
An employee's general salary and compensation records are updated in HRIS. To update compensation:
-
On the employee's HRIS profile, click the Compensation tab.
-
Select Add Salary and begin completing the salary record. Save your changes.
Tax
This page contains information on the employee's state, federal and local tax withholdings, home and work locations, filing status, and more. You can make changes to an employee's tax information from this page by clicking Modify to the desired portion of the employee's tax profile, or they may do so using our Updating Tax Withholding via eSignature feature.

Deductions
You can manage an employee's deductions from the Deductions page. Click Add Deduction to add a new deduction, or Edit next to an existing deduction to make changes to the employee deduction.
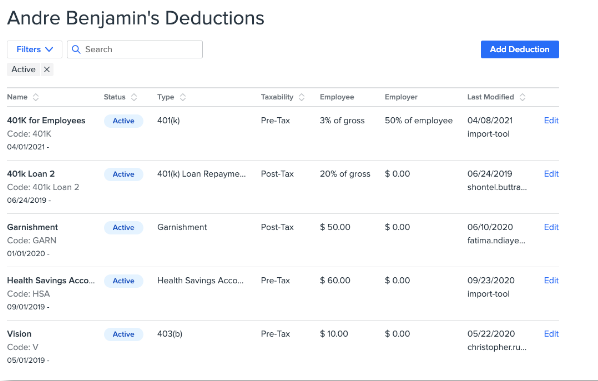
Examples of deduction settings you can edit:
-
Start and End Date
-
Deduction Caps
-
Employee Contributions
-
Employer Contributions
-
Annual Maximums
Hour Benefits
Hour Benefits allow you to pay hourly employees different rates for different types of hours, such as PTO, Sick, Sabbatical, Religious Holidays, and more.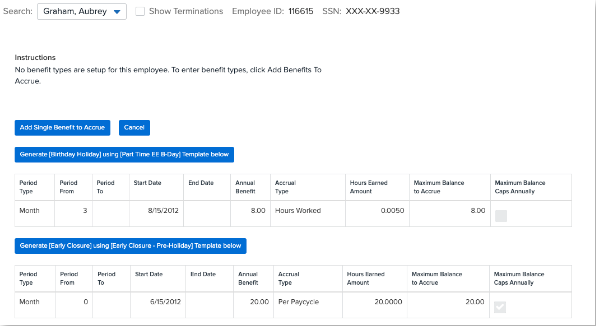
Hour Benefits are designed to allow you to properly leverage our PTO to Payroll functionality. Refer to How to Configure and Assign Hour Benefits for more details!
Bank
This page contains an employee's banking information for direct deposit. You can view the employee's banking information here, but any updates are actually made on the employee's HRIS profile. To edit banking information, go to the employee profile and click Banking Information.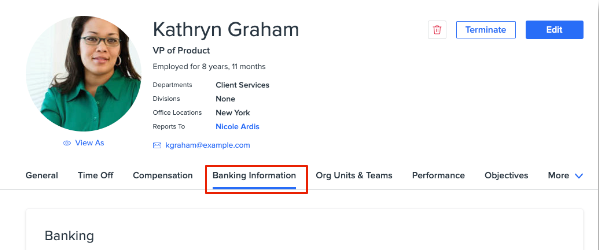
Document
Have an important payroll document you'd like to file away on an employee's profile? Click Document to store it. Our administrators typically use this page to store any garnishment or child support documentation.
Pay History
If you'd like to view an employee's past pay stubs, click Pay History.
We touched on taxes briefly in the Company Settings section, but next, we'll do a deeper dive into how we handle tax at Namely.
TAX - 4 MIN READ
PARTNER WITH NAMELY TO REMIT YOUR LOCAL, STATE, AND FEDERAL PAYROLL TAXES.
Stressed about taxes? No worries - Namely collects and remits payments to tax agencies when you process payroll. Here's how it works:
-
Make sure your company is registered with the proper tax jurisdictions your employees reside in, and you're doing business in. You'll typically need to apply for Unemployment Insurance, with your state's Department of Labor, and Income Tax, with your state's Division of Revenue.
-
Our Tax Services Toolkit can help here! Each state has a dedicated article in the Help Community that advises you on the jurisdictions you need to register within each state - because it can vary! Here's an example: New York State Tax Guide.
-
When registration is complete, the tax jurisdiction will typically provide you with a Tax ID and Tax Rate. You'll want to enter this information in Namely Payroll, by going to Company > Tax and clicking Edit next to the tax. You'll be able to enter in your ID, rate and pay frequency from the screen that follows.
-
Once you've entered the appropriate tax information, Namely will collect taxes when payroll is processed, and remit them in accordance with the pay frequency entered.
It's important to register for Tax IDs as soon as you know you'll have an employee working in a new state, or if you'll be opening up shop in a new state to avoid any potential penalties and interest. Late registrations can lead to Tax Notices and Tax Variances, which you'll want to partner with Namely on to resolve. We won't collect any funds for taxes that haven't been set up in Namely, and you'll have to remit payment to the agency until we have the proper information in the system.
Namely automatically identifies taxes that need to be collected when a new address is entered into the system that requires tax payments to a jurisdiction you haven't registered for yet. We'll let you know about it right on your Namely Payroll dashboard when you log in!
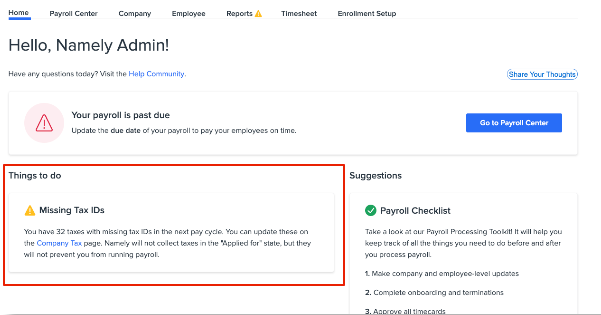
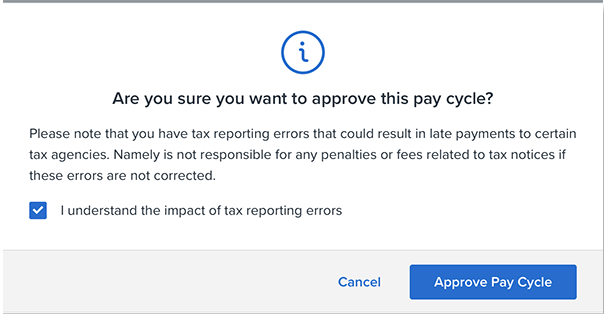
We'll also remind you if you attempt to process payroll with a missing tax ID:
Taxes are a big deal - and we're here to help make sure you get it right. If you're up against a time crunch and need some help registering for tax IDs, our Project Services team can help. Submit a Tax Registration Services project, and our team can register for an ID on your behalf.
PAYROLL REPORTS - 4 MIN READ
TAKE CONTROL OF YOUR PAYROLL DATA WITH OUR ROBUST REPORTING ENGINE.
Don't be busy, be productive with our Namely Payroll reports! Our reports will help you audit your data to avoid any potential payroll errors.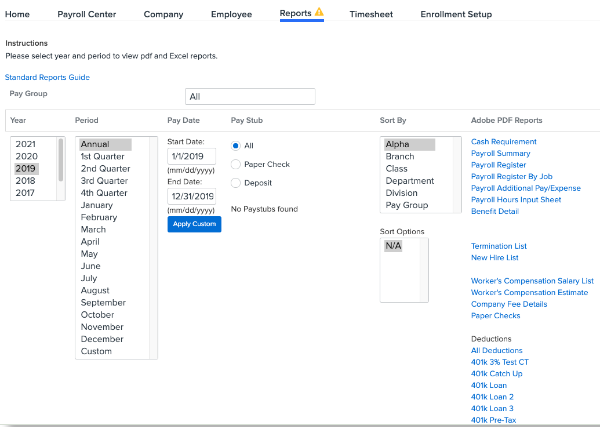
We offer a number of different kinds of reports in our Payroll reporting engine:
-
Pay Cycle Reports - These reports provide data on specific pay cycles.
-
Date Range Reports - These reports will provide you with data for a specific time period you can set by year, quarter, month, or a custom range.
-
Quarterly and Year-End Reports - You'll find your W-2s, 1099s, and Company Tax Packages here!
-
Report Writer - Can't find what you need with one ouf our out-of-the-box reports? Use our Report Writer to create your own custom report!
-
Change Log - Track changes made to payroll data using this report.
-
Error Log - Any potential errors in employee data will be flagged here. You should always review and correct these!
-
Profile Status - This report will flag any fields that are not completed on an employee's profile, that can prevent them from being paid in Namely Payroll.
Next, we'll highlight some of our most popular reports.
Pay Cycle Reports
-
Deductions by Employee and Pay Date - This is helpful to have on hand to keep track of employee deduction amounts and for later deduction audits.
-
Cash requirement (breakdown by employee) or Payroll Summary (Company totals) - This is helpful when reviewing a detailed summary of the total cost per employee per payroll (direct deposit/check amount) and taxes (employee/employer paid).
-
Payroll Register - Use this report to see the breakdown of Wages, Employer and Employee Taxes, and Employee Deductions, for each employee within a specified pay cycle.
Date Range Reports
-
Payroll Register - This report has the same information as the Pay Cycle version but provides you with totals between a range of dates.
-
Cash requirement (breakdown by employee) or Payroll Summary (Company totals) - This report has the same information as the Pay Cycle version but gives you the totals between a range of dates.
-
Deductions - This report shows you the total deduction amounts (employee and employer) for a specific date range.
Quarterly and Year-End Reports
-
W-2 and 1099 Forms - These forms are available to be downloaded as PDFs, one by one, or in bulk.
-
Quarterly Tax Packages - This report houses your reconciliation recap (a review of additional debits or credits regarding tax filings), a transcript of all deposits made by Namely for the quarter, and copies of all tax filings Namely made on your company’s behalf for record-keeping purposes.
THE EMPLOYEE EXPERIENCE- 4 MIN READ
STEP INTO YOUR EMPLOYEES’ SHOES! HERE’S HOW THEY EXPERIENCE NAMELY PAYROLL.
Now that we've familiarized you with the administrative tools available in Namely Payroll, it's time to talk about what your employees see. The Payroll Tab on an employee's HRIS profile is their gateway to their own payroll data, paystubs and tax forms in Namely Payroll. 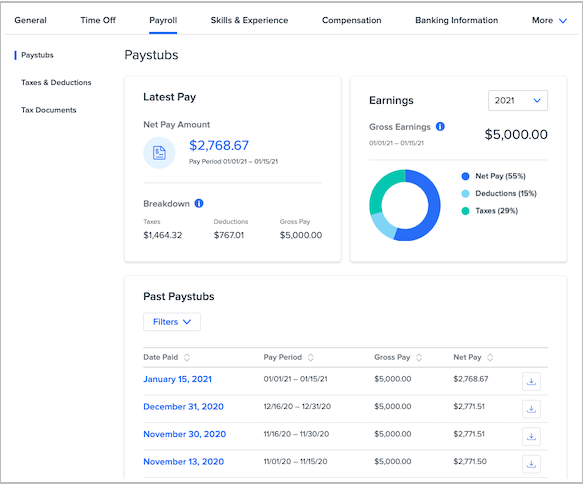
Paystub
The landing page on the Payroll tab displays Paystub information. Employees can easily track:
-
Their latest pay, with a quick breakdown on taxes and deductions withheld.
-
Gross earnings, with a helpful pie chart that helps employees track how much of their pay is going to deductions and taxes to date.
-
Their most recent and all historical paystubs, which can be downloaded as PDFs by clicking on the desired pay date.
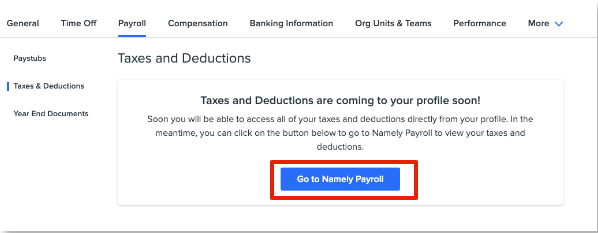
Taxes and Deductions
Employees can launch Namely Payroll to view a breakdown of taxes and deductions from the Taxes & Deductions tab. We'll be releasing a more user-friendly view in short order, but for now, employees can click the Go to Namely Payroll button to view:
-
Exempt status
-
Filing Status
-
Dependents
-
Tax Form Delivery Status (Paperless or Paper)
-
A breakdown of their per-pay-period deduction costs.
Year-End Documents
No need for a year-end scramble! Your employees can download their W-2s, 1099s and 1095 forms from the Year-End Documents page.
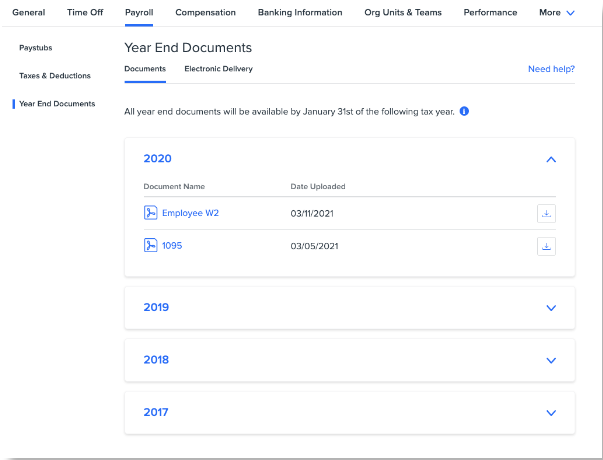
Employees can update the delivery method (electronic or mailed) for their tax documents in Namely.
E-Delivery Opt In.
Employees can to opt-in or out of electronic tax document delivery on the Year End Documents tab by clicking Electronic Delivery. To do so, click the Electronic Delivery tab and select Opt In. 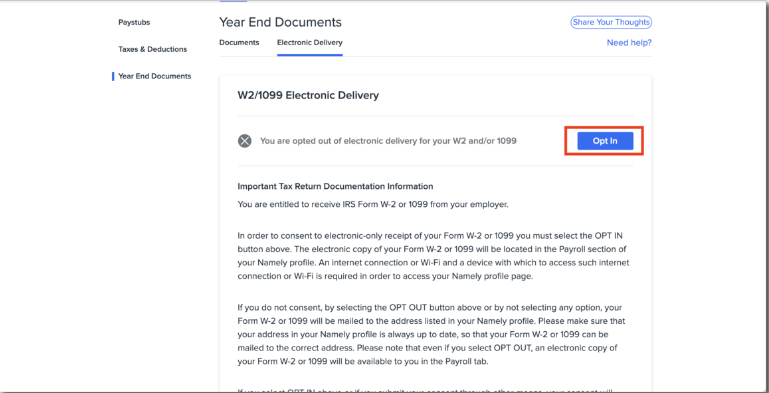
Compensation
Compensation history is tracked and viewable on an employee's Compensation tab.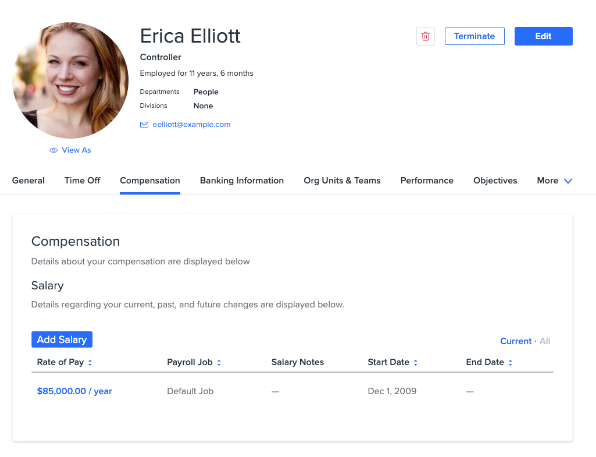
Banking Information
Employees can update their direct deposit information, or opt to receive a paper check from the Banking Information tab.
Terminated Employee Access
Terminated employees can still access their W-2s, 1099s, 1095s and paystubs provided you terminate them properly. When you terminate an employee in HRIS, you'll want to make sure you check the Give terminated employee future access to pay stubs and tax documents box, and include their email address when terminating them.
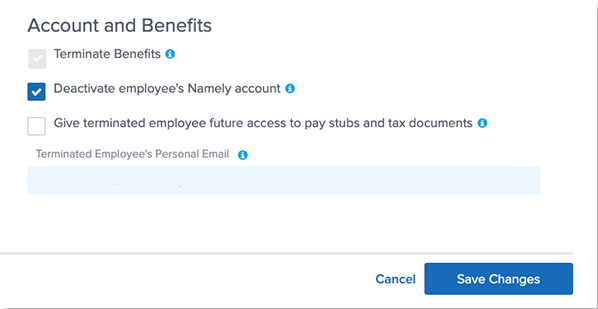
Once the employee is terminated, they'll receive an email from Namely Payroll with the subject line Reset Password to their personal email inbox. It contains a link that allows them to reset their password, which can be used to log into Namely Payroll to view payroll documents.
Withholding
Employees can update their tax withholding leveraging our Updating Tax Withholding via eSignature feature. This feature allows you to send employees W-4s to be completed via the eSignature platform. The system will update the employee's tax withholdings once they submit the completed eSignature form, either during Onboarding or via Manage eSignature.
KNOWLEDGE CHECK AND ADDITIONAL RESOURCES
TEST YOUR KNOWLEDGE AND REVIEW OUR ADDITIONAL RESOURCES TO LEARN MORE!
|
Knowledge Check: Keeping Payroll Up To Date |
|
|
|
Knowledge Check: Processing a Successful Payroll |
|
|
|
Knowledge Check: Avoiding Common Payroll Mistakes |
|
|
|
Namely Toolkit: Payroll Processing and Reporting |
|
|
|
Namely Toolkit: Tax Services |
|